.

Showing posts with label Videos. Show all posts
Showing posts with label Videos. Show all posts
Saturday, July 2, 2016
Friday, March 4, 2016

Wednesday, March 2, 2016

Monday, February 1, 2016
Tuesday, December 1, 2015
Saturday, July 27, 2013
Sunday, November 4, 2012
Tutorial: Hosting a Website : Part 3
Third and final part of the tutorial where you will see how to create a free subdomain and host your website.
Web Hosting: Uploading and Hosting Part 3 from Paper Bird on Vimeo.
Web Hosting: Uploading and Hosting Part 3 from Paper Bird on Vimeo.
Saturday, November 3, 2012
Tutorial: Hosting a Website: Part 2
Second part of the tutorial where I will be showing you how to edit the html files and add hyperlinks on to them before uploading it on the internet.
Part 2: Editing the HTML file
Web Hosting: Creating Hyperlinks using an HTML Editor Part 2 from Paper Bird on Vimeo.
Part 2: Editing the HTML file
Web Hosting: Creating Hyperlinks using an HTML Editor Part 2 from Paper Bird on Vimeo.
Friday, October 26, 2012
Tutorial: Hosting a website: Part 1
A simple tutorial on Splicing and Saving as HTML out of photoshop. This 3 part tutorial series will show you how to create a website, how to customize it and how to upload it on a hosting platform.
Part 1: Splicing and Saving as HTML
Part 1: Splicing and Saving as HTML
Host a Website: Splicing and Saving as HTML from Photoshop Part 1 from Paper Bird on Vimeo.
Friday, November 25, 2011
Mocha Compositing Test: Backyard UFOs
3D Studio Max + Adobe Aftereffects+ Mocha + Adobe Photoshop + Final Cut Pro + Canon 5D Mark II
Sunday, October 23, 2011
Saturday, April 23, 2011
Tutorial: Making the Monsters
Here to all my indie-movie friends, an interesting technique worth noticing.
What might come handy on a shoe string budget production are a set of simple-to-achieve techniques which you can easily use to create a convincing shot. Take a look at the shot below. I will break it down for you in a few seconds.
Tips to keep in mind before the shoot:
1.Carry a tripod.
2.Shoot the background on a tripod and keep it shake free.
3.Shoot the same background handheld
4.Watch out for real monsters
Things needed at the post production table:
1. The tripod shot
2. The handheld shot
3. Any Compositing Software. Here I am using Adobe AE CS5
4. The Sign Board Image for Adding to the background
The Concept:
What we are gonna do is actually very simple to understand. We now have two videos. One with the shake and one without the shake.The ideal way is to motion track the handheld footage and apply the data to the Signboard image. BUT unless you do a very very detailed tracking, chances are high that your Signboard will just dance around. So here is a smart way out. Create a composition which is dimensionally lower than the actual footage.Import the Hand held footage. Motion track the footage and we take the motion tracker data and apply it to the steady footage and the signboard, SO THAT we will get a perfectly synced composite.
*You can also use an image instead of a video.
The Break down:
1 Import the footages and the signboard.
2.Motion track the video
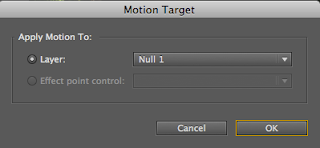
3.Create a Null Object and apply the motion tracker data on to that.
4.Now drag the sign board and the steady cam footage to the composition
5.Link both to the Null object. Now the motion tracker data is applied to both those layers.

6. Thats it! A little color correction and your shot is good to go!
What might come handy on a shoe string budget production are a set of simple-to-achieve techniques which you can easily use to create a convincing shot. Take a look at the shot below. I will break it down for you in a few seconds.
Monsters-Test from Paper Bird on Vimeo.
Tips to keep in mind before the shoot:
1.Carry a tripod.
2.Shoot the background on a tripod and keep it shake free.
3.Shoot the same background handheld
4.Watch out for real monsters
Things needed at the post production table:
1. The tripod shot
2. The handheld shot
3. Any Compositing Software. Here I am using Adobe AE CS5
4. The Sign Board Image for Adding to the background
The Concept:
What we are gonna do is actually very simple to understand. We now have two videos. One with the shake and one without the shake.The ideal way is to motion track the handheld footage and apply the data to the Signboard image. BUT unless you do a very very detailed tracking, chances are high that your Signboard will just dance around. So here is a smart way out. Create a composition which is dimensionally lower than the actual footage.Import the Hand held footage. Motion track the footage and we take the motion tracker data and apply it to the steady footage and the signboard, SO THAT we will get a perfectly synced composite.
*You can also use an image instead of a video.
The Break down:
1 Import the footages and the signboard.
2.Motion track the video
3.Create a Null Object and apply the motion tracker data on to that.

4.Now drag the sign board and the steady cam footage to the composition
5.Link both to the Null object. Now the motion tracker data is applied to both those layers.

6. Thats it! A little color correction and your shot is good to go!
Tuesday, March 29, 2011
Unveiling Video:Sony ICD-UX200 Digital Voice Recorder
paperbird: Unboxing Video: Sony ICD-UX200 Digital Voice Recorder from Paper Bird on Vimeo.
Things in the Box:
Sony ICD-UX200 Digital Voice Recorder
One rechargeable battery
USB Extender
Software CD (includes a basic sound editing application)
Carry Pouch
Headphones
Verdict:
+ Light weight and easily portable
+ HQ Sound capturing.
+ Intelligent Noise Cancellation
+ Expandable memory
+ Records in Mp3 and Wav
+ Good battery Life
- Not a great choice for professional recording
Sunday, December 5, 2010
Saturday, November 27, 2010
Saturday, October 16, 2010
Thursday, August 26, 2010
Tuesday, June 8, 2010
Monday, April 26, 2010
Tips for making a convincing CG Animation
When you are trying to create a photo realistic 3D animation,the tough as well as the most important part is to make it look convincing.Obviously this involves a lot of steps,starting from choosing the right texture, the lighting, the renderer so on and so forth.But today I am gonna tell you the 4 most important factors to consider and work on while doing a CG shot.
1.Frame Rate:
By default,most of the 3D applications render out the video sequences in 30FPS.This is to facilitate further need of frame rate alterations but most of us just go with the default fps and that makes the animation looks amateurish.Try to keep your animation frame rate at 24FPS.You can do this in your editing package as well.This will skip a couple of frames from your video and give it a Film Look.
2.Depth of Field:
Another very important factor which most of our regional animators conveniently forgets to use.Using a DOF in your 3D animation gives it a much natural feel and that sequence will blend seamlessly with the rest of your real footage.Its a bit difficult to use the 3D package's built in DOF generators but you can easily mock them by rendering out a Z-DEPTH sequence of the video and later use it on your compositing package to apply the needed blur.
3.Camera Movements:
Amateurish is when you see wiggly camera moves on a live action movie.But Professionalism is when you see wiggly camera moves on a CG movie. :) I think you got what i meant.
4.Film Noise:
A real scene is never that saturated and sharp. Add in some noise and blur to your CG shot.Use a screen shot from a real footage for reference and keep it subtle.
Take a look at my shot below:
To Know More,Visit: www.mypaperbird.com
Tuesday, March 23, 2010
Subscribe to:
Posts (Atom)