Pages

Wednesday, April 29, 2009

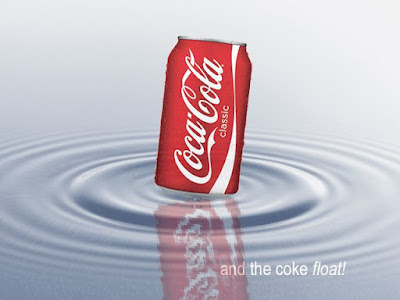
Make your Coke, Float!


I was working late the other night.Got bored after a while and thought of having some thing really cold.Then it strikes me.A Coke Float.Always liked it since a kid.More than that,one scoop of icecream and a half-can of coke were the only food i had in my room fridge last night!

Here's the recipe to the perfect drink for summer:

• 2 scoops Vanilla Icecream
• 1 cup Coke
• 1/4 teaspoon vanilla

Directions:

1.Scoop the vanilla ice cream into a tall glass filling about half full.
2.Top with cola soda.
3.Gently stir in the vanilla.
4.Have it immediately.

:)

Dreamy Composition in Photoshop


Its fun and easy to create your dreamy composition in Photoshop.

A Few Tips Coming Soon!

Tuesday, April 28, 2009

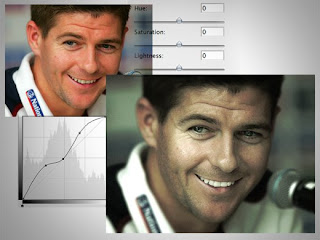
Tutorial:Photoshop:Advanced Image Processing: Tones


Here's a quick and easy tutorial on image Tone correction using photoshop.
Click the link to read the full post.


1.Open the raw image in photoshop.

2.Now we need to lighten up the eyes and the teeth.Inorder to do that, select the dodge tool.In the top Options Panel,Drop down and select Highlights in the Range.Now use the dodge brush to light up the needed areas.

3.Create an adjustment layer for Curves and Check "Use previous layer to create clipping mask".Use the eraser tool to remove the unwanted areas from the curves layer.

4.Adjust the Curves to bring down the edge brightness.Give it a more dusky appearance.

5.Now using the polygonal lasso,trace out the face.Invert the selection.Apply a feather and some gaussian blur to make the unwanted areas out of focus.

6.Cntrl+M and this will bring up the curves window.Choose channels separately and give a monotonous green look to the image.

7.Now we need to enhance the features a bit more.Duplicate the image layer.Increase the contrast to the maximum and bring down the brightness to the minimum.Desaturate the image.Go to filter gallery and apply a Glow edges filter.This will give u an alpha map of the highlights.Now change the layer mode of this layer to Overlay and bring down the opacity to 30-35%.


8.Finally flatten all the layers,go to filter>noise and try adding some noise.


Voila!

:)

Monday, April 27, 2009

paperbird.ning.com


Paperbird's Social/Multimedia Network is finally online!

paperbird.ning.com

:)

Sunday, April 26, 2009

Coming Soon: Paper Bird Network


Hey Guys,

I've been thinking a lot on creating a platform for us to share our thoughts and tips regarding multimedia and 'paperbird'.I guess its time to take our blog to the next level.I am working on a social network on ning platform to acheive this two-way info share.

Hopefully this will be up and running by the end of this month.

:)

Monday, April 20, 2009

Free Web Template: NotePad Style


Hi Guys,

Here's a free Web Template [PSD] for you. Made in Photoshop.

Check it out
http://www.4shared.com/file/100378039/606fd965/webtemplate.html?


Enjoy :)

Saturday, April 18, 2009

Tutorial:Photoshop: Realistic Text Effect


1. Open the background image in photoshop.


2. Type in the text you want and place in accordingly.


3. Now to get the feeling that the text is in the scene,we need to put some grass on top of it.Select the Polygonal lasso tool.Rasterize the texts,draw a rough grass shape on the bottom of the text. Feather the selection to 1 and delete it.


4. Now we need a shadow. Analyze the image to understand the source of light and accordingly place a distorted and transformed duplicate of the text on the grass. Use the eraser tool to remove unwanted shadow area.Use Layer style>Color overlay to give a dark shade to the shadow text.

Friday, April 17, 2009

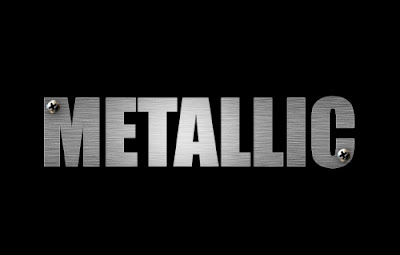
Tutorial:Photoshop: Metallic Text Effect


A Quick and easy way to create a Metallic Text.

1.Create a black background and type in the text.Try and use a thick font.


2.Now open the metallic texture image you want to use and drag it on to our document.Place it under the text layer.


3.Rasterize the type layer using the magic wand select each letter in the text layer. Now select the texture layer.Go to Select>Inverse.Apply a feather of 1 and delete.
Now bring the text layer under the texture layer.Select the texture layer and using the Eraser tool,erase the centre portion of the texture layer.This will fake a lighting effect on the text.


5.Now open a bolt image.Bring it on to our document,scale it down and place it on the text.Go to Layer Effects and apply shadows as needed.


Filming Revolution: Red One


The Red Camera is essentially a gadget you build yourself.[ just like an IKEA dining table! ] A number of different main units or ‘brains’ form the core of the camera, including a CMOS sensor and decoding hardware.

Once you choose the ‘brain’, it’s up to you to mix and match. Red cameras are based on a modular system, meaning individual lenses, batteries, viewfinders and storage can be bolted on or taken off depending on your needs and budget. At the crazy end of things, there are attachments for creating a 3D camera or 261 MP stills.

Depending on which ‘brain’ you choose, the Red camera can shoot incredibly high quality footage and up to 24MP stills. The Red Scarlet basic model (under £2000) can shoot 3K but can be upgraded to 6000x4000 pixels, while the Epic can go up to 5K.

Do you want to know whats more amusing.Bolt two Red Scarlet Cams together and you can even film in high-definition 3D.

For more information,visit
www.red.com


Courtesy :Stuff.tv

Wednesday, April 15, 2009

Wallpaper: Goodbye Milkyway


I was flying the other night,sitting near to the window of a 320 Jet,while listening to this amazing track from Enigma "GoodBye Milky way". Amazing Music.Amazing Lyrics.I then turned on my laptop and did this wallpaper,looking beyond the window for a reference.[Not really,all i could see there was a gigantic moon]

Click here to download the Wallpaper:
http://www.4shared.com/file/98243774/9ac43b47/_2__milkyway-1920.html?


Click here to watch a fan-made video of the remastered version of Goodbye Milky Way
http://www.vimeo.com/4008566


Enjoy!

Wednesday, April 8, 2009

Wallpaper: Out Bound


Sorry Guys! I was too smitten by the technique of out-of-the-bound photos today.So,did another sample with a beautiful photograph from my friend,Yazid.Check it out

Download the Full Res Image here:
http://www.4shared.com/file/97427166/496fe69b/out-of-bound-2.html

:)

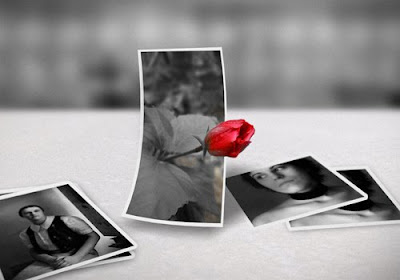
Tutorial: Create an Out of Bound Photo in Photoshop


1.Start with a suitable picture to do your out-of-the-bound.Here i am using a picture of a rose i took with my LG Viewty Mobile Phone.


2.Use the Polygonal lasso tool and trace out the rose tip as seen in the picture.Zoom in and try to be as precise as you can.

3.Now Select that layer.Cntrl+T to bring up the transform controls.Right Click to choose warp and distort the control points to bend the photo a bit.

4.Now select Image>Hue/Saturation.Bring down all the color saturation levels to -100 except that of Red.


5.Now we need to create a shadow for the photo.Duplicate the layer.Cntrl+T.Right Click and choose distort. Make it look like its casting on the plane.Apply some Gaussian Blur.Bring down the brightness and contrast until its grey shaded.

6.To finish up our scene,bring in a couple of old photos.Distort them and place on the plane.Apply Layer shadows to the Photos.

7.You can use the polygonal lasso to define the invisible plane.I applied a bit of noise on to the plane layer.And also placed a blurred photograph to add in as a backdrop.


Download the Out of Bound Wallpaper Here:
http://www.4shared.com/file/97395665/15f56886/out-of-bounds.html

Thats it! Try it on your own photograph. Its fun. Trust me!

Tuesday, April 7, 2009

Movie of the Month: Back to the Future Trilogy [1985-1990]


The best sci-fi flick ever made!

Back to the Future is a comedic science fiction film trilogy directed by Robert Zemeckis.The plot follows the adventures of high-school student Marty McFly (Michael J. Fox) and scientist Dr. Emmett Brown (Christopher Lloyd) as they use a modified Delorean automobile to time travel to different periods in the history of thier hometown.

Click here to know more about the trilogy:
http://en.wikipedia.org/wiki/Back_to_the_Future_trilogy

Click here to watch the trailer:
http://www.youtube.com/watch?v=RYWY_X96Zfw

Have a nice journey back to future!

Wallpaper: Aurora


Here's an aurora wallpaper for your desktop.The recipe is pretty simple.What i did was, create 3 big spheres of contrasting light shades,merge them together and apply a high level Gaussian blur until the colors fused together nicely.I then duplicated it to bring in more depth to the illusion.Placed a stripes layer on top of it with a 'soft light' blending mode.Feel free to check out the PSD work file.

Download the Aurora Wallpaper here:
http://www.4shared.com/file/97193889/e0fddafe/pb_aurora.html

Download the PSD work file here:
http://www.4shared.com/file/97194224/f4e3f3a6/aurora.html

Enjoy:)