Pages

Sunday, May 31, 2009

PaperBird: PhotoBlog Launch


Hey Guys,
We are launching a dedicated blog space for photos today.Thought,with the new camera and all,i might need a much bigger platform! ;)

check it out:
http://paperbirdphotos.blogspot.com/


Visit: mypaperbird.blogspot.com

Video: Forest Road


Its been quiet a while i did something on a video.Lately when my dear one,while going through my blog, expressed a rare interest in seeing a new set of "fake accidents and plane crashes", i made this up!

Pretty straightforward.I had an old 640*480 archive footage of me walking on my street.Replaced the background with a forest image; added an 'already'-crashed car and threw in some sound. That was pretty much it.No motion tracking was needed as the video was shot on a tripod ;)

See the video here:
http://www.vimeo.com/4922717


Visit: mypaperbird.blogspot.com

Saturday, May 30, 2009

Tutorial:Shooting Panorama


An introduction to creating interesting panoramas with your regular P&S Cam.
Click to read more.....

You can create interesting panoramas from your regular point&shoots using Photoshop's built-in Photomerge tool.

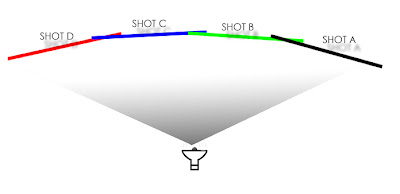
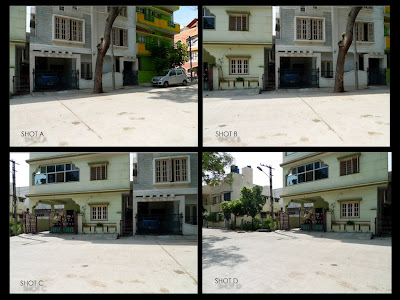
Try to shoot your stills with the help of a tripod.You can start from a side and keep shooting at least 4-5 stills each one overlapping a section of the previous shot.You can either shoot with the camera standing static at one axis while rotating or you can shoot while tracking yourself to give a flat panorama.


Here for this example,i am using an old set of [4] shots i shot in bangalore.


To create your panorama, open photoshop, goto file>automate>photomerge


Browse and select the set you want to use.Click ok.


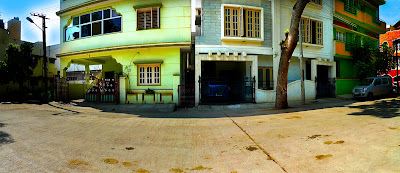
The software will automatically analyze and align the photos according to the content and give you a wide single document with all the images stitched together.Crop the image and you have a wide panorama!


Visit: mypaperbird.blogspot.com

Tutorial:Composite BreakDown: ReDiscovery


Click the link to read the tutorial/composition breakdown of the ReDiscovery Poster


The first step involved in a production process flow, when we are approaching the work professionally,is Asset Management. This is the step where we analyze and organize all the assets we have to use in the production.These could be images from the client, logos, text matter so on and so forth.Here, for this particular example, i have collected some sample images from various sources.


The breakdown screenshots are pretty self-explanatory. Also I will note down some tips i have used in creating the effects for the composite.


Note: Here i wanted the fan leaves to rotate, than just being static in the composite.So i used a elliptical marquee to select the fan area,feathered it and then applied a radial blur to give that effect of motion.


Note: Always give attention to the fine details like shadows and reflections to make your composition more believable and pleasing to the eye.Imagine a common light-source in the composition and work out the shadows based on that.


Visit: mypaperbird.blogspot.com

Friday, May 29, 2009

Poster: ReDiscovery


Click the image to see it in full size

PS: A tutorial on the making of this poster will be out soon!

Visit: mypaperbird.blogspot.com

Thursday, May 28, 2009

LX3: View the Test Shots

Hey Guys,

Posting a few test shots i took on the new LX3.I have re-sized the images to fit in the blog,but trust me,the quality it offers is amazing! Take a look.

Click here to see the images...


Visit: mypaperbird.blogspot.com

Sunday, May 24, 2009

Movie of the Month: Lord of the Rings Trilogy [2001-2003]


The Lord of the Rings film trilogy consists of three live action fantasy epic films: The Fellowship of the Ring (2001), The Two Towers (2002) and The Return of the King (2003.The trilogy is based on the three-volume book The Lord of the Rings by J. R. R. Tolkien.Set in the fictional world of Middle-earth, the three films follow the young hobbit Frodo Baggins as he and a Fellowship embark on a quest to destroy the One Ring, and thus ensure the destruction of its maker, the Dark Lord Sauron. The Fellowship becomes divided and Frodo continues the quest together with his loyal companion Sam and the treacherous Gollum...

Know more about LOTR here:
http://en.wikipedia.org/wiki/The_Lord_of_the_Rings_film_trilogy

Fire up your home cinema.Grab a bag of chips.Its time to watch the ultimate journey once again! If you haven't seen it yet...Well,you dont belong here :)


Visit: mypaperbird.blogspot.com

Thursday, May 21, 2009

Tutorial:Photoshop:Creating the Nine Miles Poster


Here is a tutorial on creating the new Nine Miles poster in Photoshop.
Click to read more.......

1.We are gonna start with a background plate for the poster.I am choosing this cliffside image and i am gonna crop a portion of it to fit in the dimensions of a vertical poster.


2.We need a monotone for the poster.So,Go to Image>Adjustments>Desaturate.


3.Now i am gonna bring in the statue image.We need to add this image on to our poster's background plate.There are a couple of ways to do this.You can either use the pen tool to trace the statue out of the sky or you can drag the image on to our poster image and use the eraser tool to erase the background sky.I opted for the second method.


4.Using the same[above said] method,add a platform for the statue to stand in.


5.Now we need to add a shadow on the grounds for the statue.Use the lasso tool to draw in a shadow shape in the ground.Create a new layer and fill the shape with a dark grey color.Apply gaussian blur and opacity changes till it looks somewhat like what u see here.


6.We are gonna add some cracks to the statue.Bring in a dirt texture image.Using the lasso tool,trace a portion,apply some feather and Cut+Paste it over the statue.Change the layer mode to multiply.


7.Now we are gonna a couple of broken pieces.What i did was to trace out a rock from the background plate itself and 'layer via copy' it.Scaled it down to match the scene and blurred it a bit to show the motion.


8.A bit more life to the scene.I am adding a flock of birds from an image.And choosing layer mode multiply to blend the layer with the scene.


9.Also added an exploding volcano layer in the back,just to set the mood all right :)


10.Burn in the titles ,add a vignette and you are good to go!


Visit: mypaperbird.blogspot.com

Wednesday, May 20, 2009

Production Gear:Lumix LX3


Soon gonna be the proud owner of Panasonic's new LX3,the long-awaited addition to the popular Lumix LX series of high-end,digital still cameras. .The LX3 comes with comprehensive manual controls and a fast F2.0-F2.8 24-60mm (35mm equivalent) Leica DC Vario-Summicron lens. Images are captured on a 1/1.63-inch CCD sensor sporting 10.1 million effective pixels.DMC-LX3 even records dynamic HD motion pictures in 1280 x 720p at a smooth 24 fps.

Will post a couple of images and a first-person review as soon as i get my hands on this piece!

Visit: mypaperbird.blogspot.com
Monday, May 18, 2009

Coming Soon:Nine Miles

LOTR:The Hunt For Gollum


The Hunt For Gollum is a 40 minute fan film, inspired by the appendicies of JRR Tolkein's classic trilogy, 'The Lord of the Rings', and made for less than $5,000.The story follows the Heir of Isildur; the "greatest huntsman and traveller in Middle Earth" as he sets out to find the creature Gollum. The creature must be found to discover the truth about the Ring, and to protect the future Ringbearer.

Check the site for more info:
http://www.thehuntforgollum.com/

Watch the Movie here:
http://www.dailymotion.com/related/x963wt/video/x93zji_the-hunt-for-gollum-hd-version_shortfilms?hmz=74616272656c61746564

Watch the FX Reel here:
http://www.dailymotion.com/related/x93zji/video/x963wt_middleearth-magic-cgivfx-reel_shortfilms?hmz=74616272656c61746564